Thursday, June 14, 2012

Inflection

I am delighted to introduce Inflection, recently published in Knitty.


Originally, it was named Caterpillar because of it's resemblance to the children's book "The Very Hungry Caterpillar."


Ultimately, Inflection seemed more in line with how everyone is naming their patterns these days.  Named for the mathematical definition of the point at which a curved line changes from concave to convex, Inflection is a lovely curved scarf that can sometimes look like a shawlette. It can be worked with any weight yarn or needle, but the pattern is written for laceweight yarn which adds a terrific lightness to scarf.


Ruched short rows create dense gussets that curve the scarf in one direction or another. Bi-directional gussets and wedges of these gussets can be varied to create different shapes and lengths. I have been playing with rushed gussets for a while, originally hoping to put them in a skirt.  However, I am delighted with how this turned out and hope to get a lot more people knitting it because of it's size.  I am also hoping some folks get creative and make different shapes with the paper wedge method I included in the instructions.  Can't wait to see what people share on Ravelry.  I like to imagine a long randomly curving scarf emulating an aerial photo of a large winding river.


Another great experience with a popular online publisher, but I must say I was jinxed when it came to photography.  Knitty requires you to supply your own photos and my nemesis was the wind.  Scarves and wind don't go together very well.  Insert curse words here.  You will notice three models in the pattern itself because I took pictures at the Outer Banks of North Carolina as well as here in Georgia.  I should have expected it to be windy on the coast.  Then back here in Georgia I found a lovely spot to re-shoot the pictures and ended up with another windy outing.  Fortunately, the editors at Knitty were able to make something out of all my pictures.

WINDY


We moved away from the water and still had wind.

Arranged the scarf differently and got lucky on a shot.


Sunday, June 3, 2012

We Got Crafty

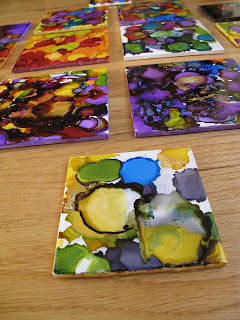
I absolutely fell in love with this idea when I found it on Pinterest.  My whole family, including my husband, has loved doing it, and every time we have a rainy day, we pull out the supplies and get started.  We plan on giving them as Christmas gifts as wall hangings and coasters. 


The supplies are simple: Inexpensive white glazed tiles from your favorite home improvement store, Adirondack Inks from a craft store which are a little pricey but go a long way, and some type of clear water based finish are all you need. 


I will link you to a website with all the info you need because I don't want to take credit for someone else's idea. However, before you leave me let me tell you how hard it has been to clear coat and protect these precious pieces of artwork. Once you have read her post make sure you skim through all the comments about finishing. Because the inks are alcohol based you must finish these art tiles with a water based clear coat. Well, silly me thought brushing on water based polypropylene would be the best approach (this was before I read all the comments).  The inks are so delicate that the brush scratched and/or moved the ink in the direction of the brush. I tried pouring it on, and though this worked best, it still "pocked" some of the most vibrant colors or made them run in the direction I tilted the tile to get the best coverage. My boys are still mad at me for messing up some of their pieces and my husband won't let me near his work at all. There are spray alternatives out there, but I haven't found one in a local store yet.  If you read the comments in the site I was working from, there were issues there. Once I find a spray to use I imagine it will take many very thin coats sprayed from very far away.


One other comments is to remind you to stay light with the ink.  My young boys just loved these inks and used way to much which is apparent by the over abundance of brown and black on these tiles.  However, My favorite one ended up being my son's blackish tile near the top right of the picture above.  Go figure.


So here is the link to the website that inspired me and has led to some terrific family time.
Artsyville by Aimee


Saturday, May 12, 2012

Specialized FATE Bike Review

As a member of Sorella Cycling I had the opportunity to demo a very nice mountain bike for three weeks.  Meet the women's specific Specialized FATE (size small).


I rode it a lot, and I rode it hard. I was lucky enough to ride it during a time I participated in two different mountain biking clinics. I'm short (5'2") and have always believed too short for 29" mountain bike wheels, but after three weeks I came away thinking I could ride a 29" wheel on a regular basis.

First off, as I suspected, I had more of a bend in my leg than I normally ride, mainly because I need to dab my foot. I'm a dabber which comes from years of riding on more technical trails in Virginia and West Virginia.  However, the trails closer to metro-Atlanta probably don't require the ability to dab.  Over time I could probably adjust to a higher seat location.

The next thing I noticed was the weight of the bike which has a carbon fiber frame.  It weighed in at 22.5 pounds which is about how much my old aluminum frame hard tail weighs.  My guy friends with huge full suspension bikes would say this is light, but I think I was hoping for less weight.

After the 29" wheels, the next biggest difference on this bike was the 26.5" long handlebars.  My current bike has 22" handle bars, and my first ride out on the FATE resulted in two handlebar whacks, one of which caused serious rib injury.  After confirming that this was a design choice on the part of Specialized and then taking a clinic with Gene Hamilton of BetterRide, I decided this is the best direction to head for correct position on the bike.  However, the majority of the time demo-ing the FATE was spent cringing (and slowing down) around tight trees.The gearing was also a change for me with a 2x10 set-up.  Didn't take long to get used to and think I would prefer this set-up in the future.

So how did it ride?  Great!  Loved it.  Felt light and crisp on curvy trails and rode over just about anything.  Even though it weighs the same as my current bike, the FATE felt "lighter" on the trail, which I assume is the carbon composite frame.  I especially liked the ease with which I could ride over rocks up steep climbs, in places I currently struggle with my old bike. On one steep hill I followed a group of riders up a trail I had never been on.  Halfway through I realized it was more than I had bargained for, but I just leaned forward, pedaled hard, and made it through.  When I looked back I realized some riders had chosen to bypass this hill. Yeah me....and thanks Specialized FATE. 

My only complaint is that as a person who struggles with tight left-hand switchbacks, this bike did not help and may have been worse.  Being tense probably doesn't help, but it felt hard to make the tight turn.  And when I fell, which I did a couple times, it was so far down.  I had way more bruises than normal after this demo.  I'm not sure if that is because I was pushing it further to test it's capabilities, or was it "more tippy" because of the height?  Maybe a combo of the two?

I'm sure I read about the FATE's other great features, but didn't really have time to take note on this demo.  There were, however, some time slots left in the schedule, so I signed up to demo it again in September.

Bottom line is that I am definitely going to get a 29" hard tail in the future thanks to the opportunity to ride the Specialized FATE for three weeks. I have been swayed away from a full suspension 26" bike and the FATE is definitely in the running for my new bike.  Now you might want to take all this with a grain of salt when you realize I currently ride a 13 year old Trek 8000.  One might say anything is an improvement of an old hard tail with v brakes.

Friday, May 11, 2012

Grapefruit

In the midst of finishing a design submission, I was working on this popular pattern by Hilary Smith Callis.  Citron is a free pattern on Knitty.com that many Ravelers have tried their hand at.  I couldn't resist because it looked so light and lovely.  It is wonderful, and I have even been wearing it this spring in a very warm Georgia.  I'm not a fan of the m1 holes you can see in this first picture, but it looks like the original piece for Knitty has the same holes.  To be honest, I can't recall if I used kfb or lifted the strand in between to add a stitch.  Logically, I would have used kfb because it looks best on higher weight yarns (no hole), so let's go with that.


Very easy knit for a single skein of lace.  I might make another when I have time.  Good idea for Christmas giving.  I get lots of compliments from the "younger" crowd.

Biker's Biscotti

I'm a member of an all women's cycling group in Atlanta, GA called Sorella Cycling.  We hold an annual meeting for all members as a time to meet everyone, share info on our sponsors benefits, and distribute cycling kits (our uniform).  This year the food provided is themed towards homemade, nutritious, high-energy snacks that can be taken along on bike rides. Earlier in the year ,two members of our Race Team held a "clinic" featuring over 15 different samples from themselves and other members.  It was a mad success, and I volunteered to make my favorite for the Sorella Annual Meeting in April.

I am by no means a vegan.  In fact, I tend towards a Paleolithic (modern day cave-man) diet, but these energy bites are vegan as well as gluten free.

I made single recipe and a double batches for over 100 large bite size biscottis.  If you think you will save money by making your own high energy snacks, don't try this recipe. Based on the amount and cost of the almond flour and chia seeds alone, they have reached at least 60 cents per serving.


INGREDIENTS
almond flour - 1 and 1/4 cup
arrowroot powder - 1 T
salt -1/4 t
baking soda - 1/4 t
natural peanut butter ~1/3 cup
raw pistachios - 1/4 cup
chia seeds 1/4 cup
flax seeds 1/4 cup
grape seed oil 1/8 cup
agave nectar - 1/4 cup
orange zest - 2 t
 

DIRECTIONS

1. Combine almond flour, arrowroot powder, salt and baking soda and pulse well.


2. Whisk in agave nectar, orange zest, peanut butter, oil, chia and flax seeds..

3. Add in pistachios.

4. Form two logs on a parchment-lined baking sheet or lightly coat baking pan with grape-seed oil


 5.  Bake at 350 for 12 min.  Remove and cool for 1 hour.


6. CUT logs into 1/2" slices with a very sharp knife.


7.  Spread slices out on baking sheet and bake at 300 degrees for approx 12 min.

8. Cool and enjoy


The logs seem to crack no matter how you small you make them.  Then the cut pieces like to break along these cracks.  They don't stay together very well in a biking pack, but they are still so yummy.

Next up in the food department:  Homemade LARA bars.

Friday, April 6, 2012

Happy Birthday to Me

For my birthday I squeezed in a little race before going out of town with the family for spring vacation.  I participated in the Blankets Creek Dirty Duathlon, in Canton GA. 

 
Before the Duathlon

Here I am with some of my fellow Sorella Cycling friends....all faster than me. Maybe it will rub off on me. I kept Linda and Amy in my sights during most of the run, but Julia was way gone. Later, I saw the flash of a Sorella jersey during the biking section, but after I took a major spill I was sore and a little disheartened. The course was one of the tougher I have raced in the Atlanta area and as I age I definitely get a little more cautious. In the end, I finished about 10-15 minutes behind the winner (Julia) and second in my age class, so all in all a nice birthday present. 


Post Race

And I just finished up a submission to Knitty First Fall with two of these three yarns.  It was a squeeze to finish it up since I decided to submit about three weeks before the deadline.  I can't wait to share whether the design makes it or not.  I finished the photography at the beach and had one day to get it done.  Probably the most stressful part because of the wind and limited lighting.

Monday, February 27, 2012

Peanut Butter and Gelly

This project was so easy, but my kids decided it was too sticky to do more that their obligatory "one." Did you get my play on words with "Gelly" standing for the Knox gelatin?  So far we haven't seen any birds on them even when the bird feeder in this area is ravaged every time I fill it.  I'm thinking only "clinging" birds will be able to get at them.  Nut hatches and woodpeckers maybe?


This project is a variation of an idea I found through Pinterest (eighteen25.) I have added peanut butter because my birdies respond well to peanut butter suet, and I doubled the recipe. This batch made all the bird feeders shown in their molds on the table (four larger feeders and four smaller ones).


Ingredients
1 1/2 cup birdseed
1/2 cup water
2 small envelopes of knox gelatin
twine or string
cookie cutters or molds
wax paper

Instructions
Mix together the envelopes of gelatin with the water and bring to a simmer while stirring.  Continue stirring until the gelatin is dissolved.  Remove from heat and let cool for a minute.  Stir in the birdseed and peanut butter adding a little more if there is liquid still in the bottom of the pan.  Lay cookie cutters out on wax paper and fill half way with birdseed mixture.  Cut twine, knot the end and push the knot down into the birdseed.  Finish filling with birdseed, making sure to cover the end of the twine and knot. Push the birdseed evenly into the cookie cutter until it's full.  Allow them to dry overnight.  I didn't turn them as called for in the original recipe and they dried just fine.  Remove from the cookie cutters and hang them in your trees for the birds to enjoy.


Friday, February 24, 2012

Dog Walking Mitts

I have just released a new pattern called Dog Walking Mitts.  What started out as a way to use up a cool skein of discontinued yarn turned into more practice in the design world.  As I was knitting these gloves I realized that a simple pattern like this might be a good place to start if I ever want to design with brioche.  When I decided to target knew brioche knitters I thought it best to get some test knitters.  Thanks to Mary Ann, Melanie, and Quyen it became a very collaborative process.  Because it was going to be a free pattern I was able to use a forum on Ravelry to discuss modifications as a group. I tried my best not to use Nancy Merchant's terminology from Knitting Brioche, so the pattern developed into a bit of a tutorial.  I was trying to be as simple as possible with the pattern itself, but ended up with lots of information on brioche stitch.

Dog Walking Mitts has simple instructions with helpful hints where all newbies seem to struggle.  Worked in the round, this pattern utilizes a slip stitch method of brioche called Stockinette Brioche Stitch (not Fisherman's Rib) and has a plain stockinette thumb.  These mitts are a great way to highlight a yarn with colorful features as well as a great stash buster for those single skeins of yarn just waiting to be used up.


Finished Measurements

Cuff circumference:  7 ½" / 19 cm (unstretched);
Length: 7 ½" / 19 cm

These gloves are easy to size up by adding an even number of stitches to the cast on number. To make the thumb larger, work 2-4 more sts with waste yarn, and pick up extra sts on the sides.

Yarn

150 yards of any worsted weight yarn; The sample shown was made using Araucania Magallanes (198 yds / 181 m; 3.53 oz / 100 g)

Needles

Set of size 7 US / 4.5 mm dpns (or circular needles for magic loop)
Size 10 US / 6 mm needle to bind off


Friday, February 17, 2012

Too Big for My Brioche Britches

Last night while watching Grey's Anatomy and knitting merrily along, I noticed I had crossed a cable incorrectly on my Brioche Stole.  I had  crossed the cables while driving through the carpool line to pickup my son at school.  Literally, a winding stop and go line through a huge parking lot to pick up kids.  I knit the whole time on the long straight stretches and when stopped.  I do stop on the 180 degree turns you have to take every so often, but until now, thought I was being pretty efficient.

Take a look a the middle cable cross over.  It has four blue knit columns between the two columns that branch off to the left and right.  It's supposed to have two.  Don't look too closely or even too far ahead in the pictures because you might catch something I didn't.


No problem.  I'm getting really good at Brioche. I can rip back 8 working rows (or 4 brioche rows) and repair it.  Check out my mom's groovy dpn needle from the seventies.


Here I am almost done with the repair.  And I did this with two annoying little boys trying to make conversation with me.  I bribed them with my favorite black cherry sodas to be quiet, but it wasn't very effective.


VoilĂ !  Crickets.....Damn.  All three cables on the left were wrong in the first place.  Now apparent from the six blue knit columns between cable crossovers #2 and #3.  There are supposed to be four.


This is what happens when you get too big for you Brioche Britches.

Tuesday, February 14, 2012

Two Hats

I finished these two hats for my boys in January.  Of course living in the southeastern United States leaves one little opportunity to wear hats. My kids have worn their winter coats a week at most so far.  I used my Root for the Team pattern as a starting point, but the logos were a bit fiddly.  Since I didn't repeat the logos around the hat like the pattern calls for, I couldn't use stranded knitting techniques.  Somehow, I was still able to knit in one piece with a little stranding, a little intarsia, and some tricky wrap and turns. 

Seneca's hat has black embroidery to add the last color

Alden's logo is a little wrinkled at the top because of the size of the S.
If you are interested in trying to make these hats please let me know.  If I get enough interest I might write an adendum to the pattern on how I did this.

On My Needles

This is what I am working on now  Bi-Color Brioche Stole by Lily Chin.  Nineteen inches done, thirty three to go.  I have been a little addicted to brioche right now.  It's definitely getting easier with practice and I'm feeling brave enough to try more designing than my soon to be published Dog Walking Mitts
.
Light Color Side

Dark Color Side

Lovely design and easy to master, but be warned that this pattern has errata.

Monday, February 13, 2012

Test Knitters and Tech Editors

I recently spent some time giving my opinion on a Ravelry forum and though it would make for a good blog post.

I came up with an analogy for the valued Test Knitter and Tech Editor.  My analogy is related to engineering since I used to be a manufacturing engineer. I think of the designer as the engineer who designs the factory process to manufacture a product. The test knitter is like the lead operator on the factory floor who tells the engineer if the process is going to be operational for all the factory workers, and the tech editor is the technician who makes sure all the process set points make sense for all the operating speeds. A high quality functional product cannot be produced without all three.  I might add that icing on the cake is a layout editor, and since I have had a hard time finding a good factory analogy they might not be as necessary as the first two.

My best test knitters make sure my pattern actually produces a wearable garment, find the errors, and make recommendations for pattern flow. My best tech editors will even test knit a swatch if they change something significantly, but their main function is checking for knitting nomenclature errors, checking grading, and making sure you’re sticking to your style sheet (if you have one).
If you are good at grading and editing your own patterns a tech editor won’t cost much. I could almost tech edit, so I haven’t really paid much…..but I ALWAYS get an editor. I spend more time interacting with the test knitter, so I think I find more value there, but that is more of a personality trait on my part.

PAUSE.  Several people on the forum disagreed with me that the test knitter is as important.  so I said:

A while back I recall reading a thread somewhere about what comes first: Tech editing or test knitting? Of course there was no hard and true order, but I remember thinking the same thing I am thinking here. The best way to eliminate errors is to have both, and I stand by my feeling about the test knitter. Without the test knitter you don’t know for sure whether the pattern is workable and will actually make the advertised garment. Nothing irritates me more than errata. It seems every publication and pattern has errata. I always start a pattern by looking for errata on the Internet. It’s not small stuff either, and seems to be worse on major publications churning out a lot of patterns. I agree that it is cost prohibitive to pay a test knitter what they are worth, but in my engineering world it’s the equivalent of slowing down and/or shutting production down. I guess the deference is that knitters are just crafters who do not place a huge financial value on their wasted time compared to a production line which losses money when shut down.

Saturday, February 11, 2012

Just a Little Something

Just a little something I have been working on that turned into a lot more.  I made these fingerless gloves one weekend in an attempt to find a home for a single skein of really cool yarn I have.  I decided brioche stitch would be a simple enough stitch to highlight the yarn, but a little more interesting than stockinette or ribbing.  I just winged it, casting on my best guess number of stitches and ended up with this cute glove.  It was so cute and easy I thought it might make a good knitting pattern to offer on Ravelry for free.  Not to bore you with the details, here I am about two weeks later with a stable of terrific test knitters who have given me great feedback, a tech editor with the pattern in hand, and a publication date of February 20. 


The pattern is targeted towards experienced knitters trying brioche for the first time.  I say experienced knitter because I almost ended up with a "hater" on Ravelry after a beginning knitter misinterpreted the "beginner" part and really couldn't get started on the gloves.  Knit in the round on dpns and learning brioche at the same time would be too much for a new knitter.


It is such a perfect pattern for using up that single skein of hand painted, self-striping, or tweed yarn that you just love but can't find a home for.  The ribbed nature of this brioche stitch (also called fisherman's rib) allows for variability in gauge so that you don't really need to swatch.  I give the gauge in the pattern, but I never swatched it myself.  Only one of my test knitters swatched because she wanted to up size them for her father.

Another key point to this project is that it is a quick lesson in brioche that results in a useful accessory.  For me everything has to have a purpose.  I have a hard time knitting a swatch just to learn a stitch, or knitting a shawl because it has a beautiful stitch pattern.  By the time you finish this glove you will know whether you love brioche, and it doesn't take long to complete your pair.

BTW - The yarn in these mitts have been discontinued, but if you really have to know what it is wait for the release of the pattern which has all the details.  Sorry, but I'm too lazy to look up the info for a hyperlink.

Friday, February 10, 2012

To Begin With

I have made a big decision to change from WordPress to Blogger because it is FREE and easier to understand.  Until I sell a lot more knitting patterns and/or win the lottery I have to do what makes financial sense.  I have also decided to include my musing on my other big hobby which is endurance racing.  Anything that includes cycling, running, swimming, orienteering, and being outdoors.  You name it, I will try it.  And just to make it interesting, maybe I can throw in a few parenting tips.  Who knows. I could end up being some famous Mommy Blogger. 


This is me, Jean Miller, mom of two little boys who loves to knit, ride bikes, and ponder life in the milli-second before she falls asleep after an exhausting day of living.